How can we help?
RTV Interface
Overview
The Scytec Real Time Viewer (RTV) is a configurable dashboard which is designed to show data in a variety of formats. The data is automatically refreshed approximately once a minute providing up to date information at all times. An unlimited amount of screens can be created, each with any amount of windows. The screens are per user name and can also be assigned to user groups allowing users to inherit Screens. Screens can also be set to rotate creating a slide show effect with the data.
Video

Default RTV views
The RTV has a default view that will automatically display when using a new user account that does not have any RTV screens defined. If no data has been collected the RTV pane will display “NO DATA”. Once machines are defined and data has been collected the default views should display as expected. If the user is part of a group that has screens assigned to it but not selected for the Auto Settings no RTV screens will be displayed. The default screens will only be displayed if the Auto Settings have not been configured for the logged in user or their group. The default screens can be modified or removed from the system altogether.
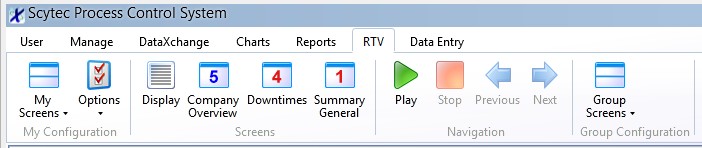
Navigation
The four buttons in the Navigation section of the RTV tab can be used to manually control the display and rotation of the RTV screens. Pressing the green Play button will start the automatic screen rotation. Pressing the red Stop button will end the automatic screen rotation. The Forward and Back buttons can be used to manually move through the screens that have been configured for rotation.
If rotation is active and the Forward or Back button is pressed the automatic rotation will be canceled.
Auto Display RTV Screen
If the user clicks on the RTV tab and has any screens selected for auto rotation, they will automatically display in the order that is defined under Auto Settings.
Auto Startup
DataXchange can be set to automatically login when the application starts as explained on the Auto Login help page. When the Auto Login functionality is used the RTV can also be set to launch automatically.
On the Auto Login page on the User tab set the Default Tab to RTV. Enabling this setting with Auto Login enabled and configured will cause the RTV to be displayed upon startup. The default RTV screen and the rotation options can be configured on the Auto Settings page described below.
Auto Settings
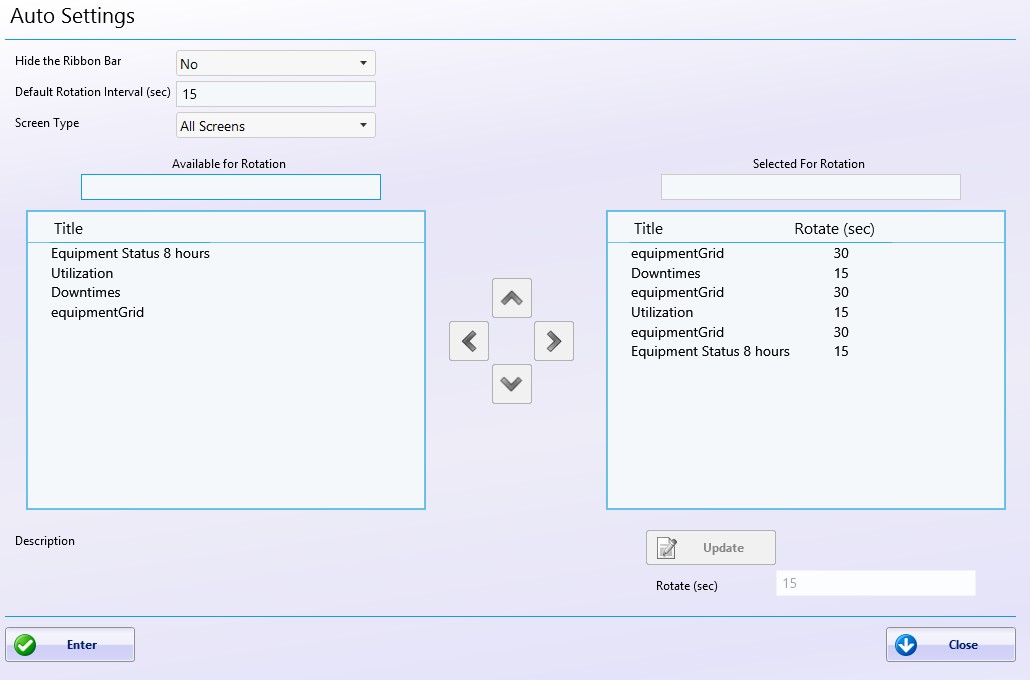
The Auto Settings screen, which can be accessed from the Options drop down on the ribbon bar on the RTV tab, allows for the ability to further customize what is being displayed within the RTV rotation and for how long. Below is a breakdown of the options and their functionality.
RTV Screen Rotation
The RTV has the ability to rotate through existing defined screens allowing multiple screens to be scrolled through automatically. From this screen you are able to fully customize the rotation of the RTV. You are able to set the time of the rotation as well as add more screens. It is possible to add the same screen multiple times.
Use the arrow buttons to select screens from the Available for Rotation Column and move them over to the Selected for Rotation Column. When moving a screen over the Default Rotation Interval (Sec) will be applied. You can modify the Default setting by using the update button below. It is possible to add the same screen multiple times within the same rotation.
A minimum of one screen must be selected for rotation. If only one screen is selected nothing will actually rotate, but the rotate settings will apply, such as hiding the ribbon bar when rotation is active.
The rotation interval and ribbon bar settings can be set here as well. Configuration from these screens will be for the current logged in user.
RTV Options
- Hide the Ribbon Bar: Automatically hides the Ribbon bar when rotation is enabled. Also hides the menu bar during rotation in the Data Display RTV.
- Default Rotation Interval: The default rotation interval when adding a new screen selection to the rotation.
- Screen Type: Filters which RTV reports are shown by Group Screens or My Screens.
Using the example screen shot below you can see that the same equipmentGrid screen is used multiple times throughout the rotation and is also set to a different rotation time than the other screens.
Display Screens
The Display page allows viewing of any RTV screens that have been previously defined. A combination of Company defined screens and User defined screens will be shown in the list. The screens can be filtered by the Screen Type drop down and by typing in the search box above the list. Select a screen from the list and press the Display Now button to display the selected screen.
Ribbon Bar
Shortcuts to commonly used screens can be added to the RTV ribbon bar by administrators or individual users. Using the Group Screens button the ribbon bar can be customized by an administrator for groups of users. Buttons added from the Group Screens button will have blue icons identifying that it is a company level Screen. When using the My Screens button the ribbon bar can be customized for the logged in user. Buttons added using the My Screens button will have red icons identifying that it is a user level Screen. The shortcut buttons added to the ribbon bar will have a generic icon showing the number of views it is configured for.
To customize the ribbon bar click either My Screens or Group Screens then select Customize the Ribbon Bar. When using My Screens, the Screen Type drop down will have three options: All Screens (the default), My Screens, and Company Screens. This drop down filters the content of the list on the left when determining which screens to place in the ribbon bar. When using the Group Screens customization the User Group drop down will determine which users see these screens in their Ribbon Bar.
The order of the shortcut buttons in the ribbon bar can be changed by highlighting a row in the Selected list and using the up and down arrow buttons to change the order of the buttons. Screens assigned to a group are always displayed furthest to the left.