How can we help?
ODI Overview and Setup
What is the ODI?
The Operator Data Interface (ODI) is used to view data and to manually enter data such as downtime reasons, work orders, the active part number, good and scrap part counts, users, or to just trigger events such as sending an email or text message. The ODI can be run within the DataXchange application or on a Windows PC or tablet, an Android tablet or phone, as well as an iPad or iPhone. A device running the ODI app does not need internet access to enter the data allowing the device to be secure on the shop floor, however network access to the DataXchange service is required.
Note: The ODI within the DataXchange Application is unavailable for accounts created after August 2nd, 2023.
When using the ODI within the Windows DataXchange application it will automatically connect to the service listed under the Manage tab → DataXchange as well as pass over the credentials used to login. If there is more than one DX service listed the service name will need to be entered when the ODI is first loaded on a PC. This can be changed with the Host Name option in the menu located in the top-left corner.
A DataXchange login is required for the mobile ODI app.
ODI Architecture
All data entered from ODI is sent to a DataXchange Service and the data is processed by the DX Service. Therefore, after the initial install of the DataXchange Client the computers utilizing ODI do not need Internet access.
Since the data is sent from the ODI to a DataXchange Service all of the data is processed by expressions providing all the power and flexibility the expressions have to offer.
If the DataXchange Service is not available then a message will appear on the ODI notifying the user that the DX Service is not available.
ODI Setup
DataXchange uses Expressions to evaluate and process incoming data from the Operator Data Interface Screen. Therefore, the ODI Source needs to be added in the Communication section for each piece of equipment that will receive data from an ODI screen. Newly created machines will have this source created by default. The appropriate expressions must also be added to process the incoming data.
To add the Source, go to the DataXchange tab and then select the Equipment in the list. Click the Communication button in the ribbon bar in the DX Setup section and add the ODI option for the Communication Type.
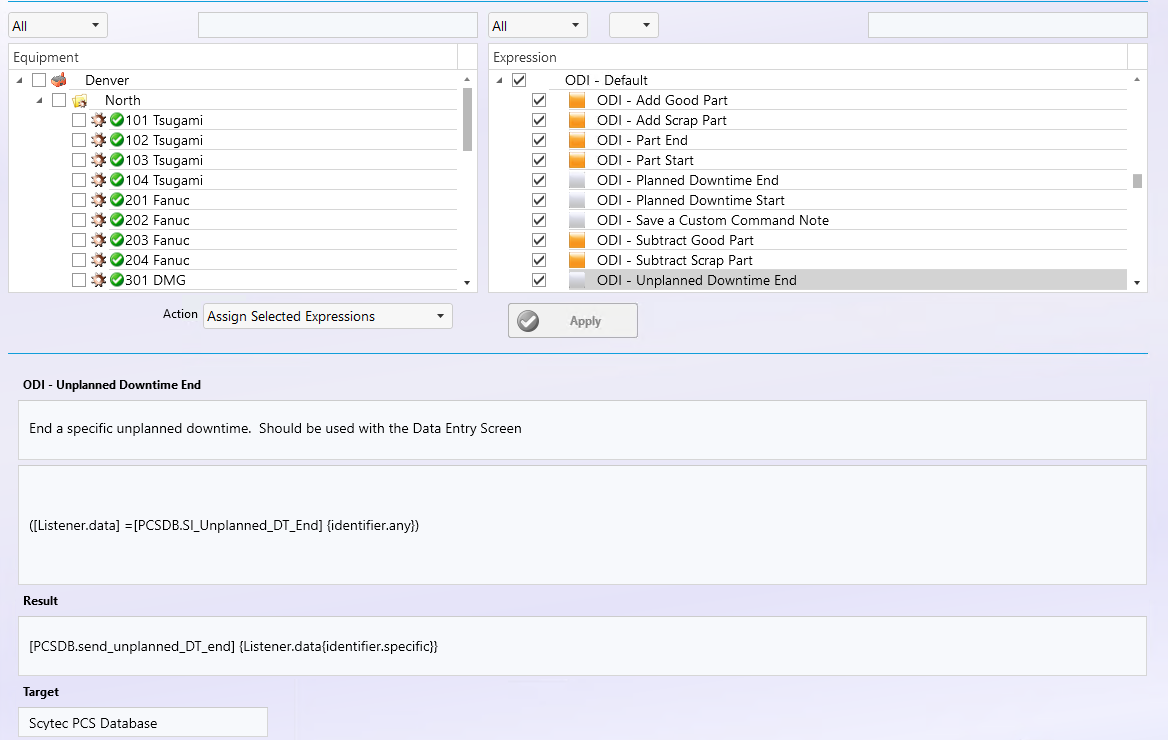
The ODI uses Data Listener Variables. There are multiple default expressions that come with DataXchange that just need to be assigned to get up and running with the ODI functionality. An expression needs to be added for the start and end for each Status Type that the ODI screen will be used for. Additional expressions can be assigned to allow entry of part and work order information into the ODI.
In the example below various ODI expressions have been assigned.
ODI List Filtering
The lists that are available on the ODI screen such as the Unplanned Downtimes, Planned Downtimes, Cycle Statuses, and Custom Commands can all be filtered based on the selected piece of equipment.
- Filtering Unplanned, Planned and Cycle Equipment Statuses can be done on the Equipment Status Group Assignments page.
- Filtering Custom Commands can be done on the Custom Command Assignments page.
ODI Configuration
The first time the Operator Data Interface is opened the Host Name page will be displayed. Either the host name or IP address of the DataXchange Service can be entered for the Host Name. The Host Name screen can be accessed at any time from the login screen by pressing the Gear icon.
The configuration page is used to select the equipment for the associated PC or tablet. The order of the equipment can be changed by dragging equipment within the Selected grid. The selected equipment will be visible on the associated device regardless of which user is logged into ODI.
Equipment can also be centrally administered either by user or by device. This is found on the Manage tab under Settings → Application → ODI. More information can be found on the ODI Assignments page.
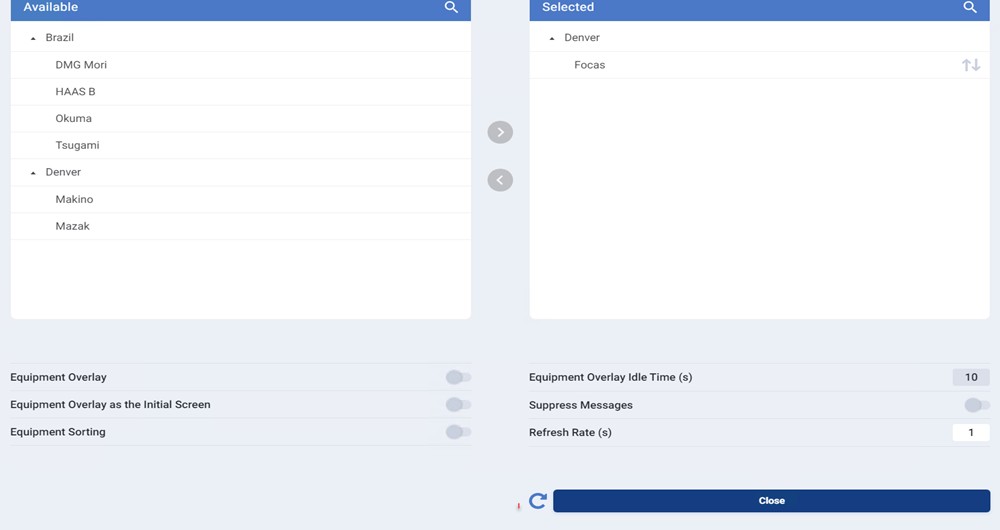
The following settings are available on the configuration page:
| Setting | Description |
|---|---|
| Equipment Overlay | The Equipment Overlay enables the automatic switch to the Overlay View. If enabled the screen will automatically switch to the Overlay View after a certain amount of time of no user activity with ODI. |
| Equipment Overlay Idle Time(s) | The amount of time in seconds of no usage of ODI before automatically switching to the Overlay View. This setting is not used if the Equipment Overlay is disabled. |
| Equipment Overlay as the Initial Screen | The Equipment Overlay view will be shown immediately after a successful login. |
| Suppress Messages | ODI has the ability to receive messages from DataXchange. If ODI is used as a dashboard rather than having an operator interact then the messages should be suppressed. |
| Equipment Sorting | When Equipment Sorting is disabled the equipment will be presented in the order in which they were setup on the configuration page. When sorting is enabled the equipment will automatically be sorted by General Equipment Status. Unknown Downtime will be first, then Unplanned Downtime, Planned Downtime, then In Cycle. |
| Refresh Rate(s) | The Refresh Rate is the pace in seconds at which ODI will refresh with new data. On slow network connections the refresh rate can be slowed to improve performance. |
Flashing the Equipment Cards
The color on the equipment cards can be set to flash in 1 second intervals by using the following Result expression:
PCSDB.ODI_flash{On}
The flashing of the equipment card can be disabled by using the following Result expression:
PCSDB.ODI_flash{Off}
ODI Equipment Overlay
The Equipment Overlay is a screen where the equipment cards for all of the selected equipment are displayed. Selecting an Equipment Card will hide the overlay and display the main ODI screen with the associated equipment selected.
On the ODI Configuration page the Equipment Overlay can be set to be the default screen when the application opens as well as having the Equipment Overlay display after a set amount of inactivity time.
Requiring a Note when Entering a Status
Per status it can be mandated that a user enter a note when changing status of a machine through the ODI screen. To enable this, navigate to the Manage tab → Equipment Status. More information on how to enable this can be found here. Once this option is set to Enabled, if a user attempts to start a status without entering a note and a note is required, they will receive a message that a note is required and the status will not start.
Saving and E-mailing Notes
Once an Equipment Status or Scrap Part Note has been entered a report can be run to view the notes entered into the system. Something to keep in mind, when using the Custom Command notes feature there are separate expressions for saving the note vs other tasks.
Notes that are entered into the system can also be sent in an e-mail. This can feature can be used for any of the note options, including machine statues, scrap parts, and custom commands.