How can we help?
OPC UA Communication as a Source
Overview
DataXchange supports OPC UA allowing the retrieval of machine information from supported OPC UA servers. An OPC UA enabled server can be setup as a Source of data within DataXchange.
Setting up OPC UA as a Source is done by connecting to the DataXchange Service from the DataXchange tab, selecting the associated equipment in the tree list, then pressing the Communication button in the ribbon bar. The machine must not be active in order to modify the communication information. After selecting Add or Modify in the Communication Information window, leave the Communication Role set as Source and select OPC UA Host from the Communication Type drop down.
After closing the dialog, the IP Address or Host name needs to be specified along with the TCP Port. The host will be where the OPC UA server is installed. A Route may be specified if your OPC UA server requires a specific URL for discovery purposes. The Endpoints are used to select the type of encryption you would like to use (see image). The default Poll Rate of 5 seconds can be modified if needed. This is the rate at which DataXchange will request information from the server.

The session information is displayed within the Session section after successfully discovering an OPC UA host. Enter in a user name and password if required. The requirement of a user name and password is based on the capability and settings of the OPC UA server.

Security certificates are required by OPC UA. Some OPC UA servers will automatically generate the needed certificates for you while other servers require the certificate to be generated elsewhere. DataXchange can generate the needed security certificate if the OPC UA server does not automatically generate one. Once the export button has been pressed, the certificate will automatically be saved to the users desktop. The certificate can then be applied to the OPC UA server per the instructions for the server.

OPC UA Mapping Options
Below the OPC UA mapping list, there are options that can be used to edit, clear or change the OPC UA mappings. When navigating through the OPC UA mappings list, the following rules will apply to the buttons once a mapping is highlighted. Below is an image of the two configuration buttons.

Click Modify to map a variable to an OPC UA node or alter an existing mapping. Click Clear to remove a saved mapping.
Once the Modify button has been pressed a second screen will pop up displaying all of the possible data nodes for that OPC UA server allowing them to be mapped to DataXchange variables. Below is a screen shot of that functionality.
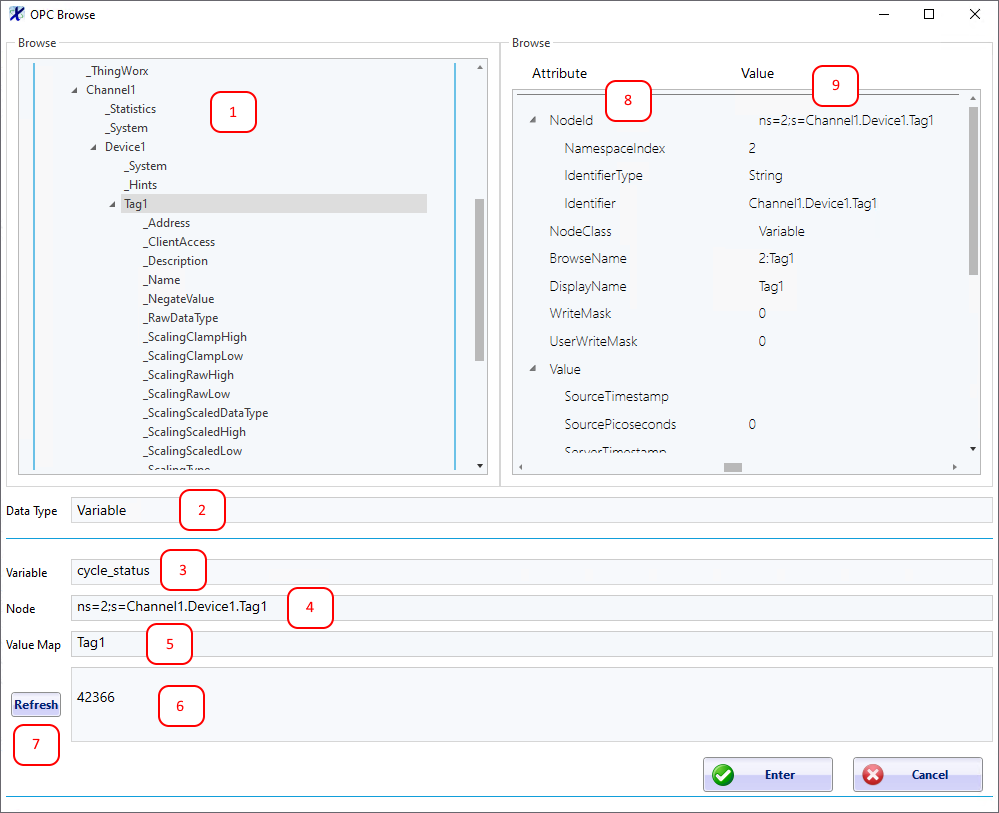
Using the screen shot above, the information for each section of the screen are detailed below.
- Section #1: The nodes returned from the OPC UA Server.
- Section #2: The data type for the selected Node. DataXchange only supports the data type Variable.
- Section #3: The name of the DataXchange variable which will be mapped to this node.
- Section #4: The current path of the selected Node.
- Section #5: The name of the currently selected individual Node.
- Section #6: The current value that is returned from that Node.
- Section #7: The Refresh button can be used to update the current date.
- Section #8: The list of attributes available for the currently selected Node.
- Section #9: The values of the attributes for the currently selected Node.