How can we help?
Manage RTV Screens
Overview
RTV Screens can be created using either the Group Screens or My Screens buttons. Group Screens will be available to all members of the user groups that the RTV Screen is assigned to. RTV screens can be customized by an individual user by using the My Screens button. Screens can be shared from the My Screens to the Group Screens using the Share a Screen functionality. More information can be found here.
There are two menu items accessible from when managing RTV screens when using the My Screens or Group Screens options:
- Add and Modify the Screens
- Customize the Ribbon Bar
Add and Modify the Screens
RTV screens are created, modified, copied, or removed here. For Group Screens, users that are a member of the associated user group will have access to view the RTV screens from within the RTV tab, but they will not have the ability to edit them. Users will also have the ability to make a copy of the RTV screen and modify the copy as a personalized screen. Click here for more information about custom screen creation.
User Group Assignments
Views can be assigned to specific user groups by using the User Group Assignments. More information about groups and creation can be found here.

Customize the Ribbon Bar
Shortcuts to screens can be added to the ribbon bar for quick access. All RTV screens created from within the My Screens or the Group Screens will be visible in the selection list for the associated user group selection. Selecting a screen and moving it to the right selection window will add a shortcut to the ribbon bar allowing easy access to launch the screen.
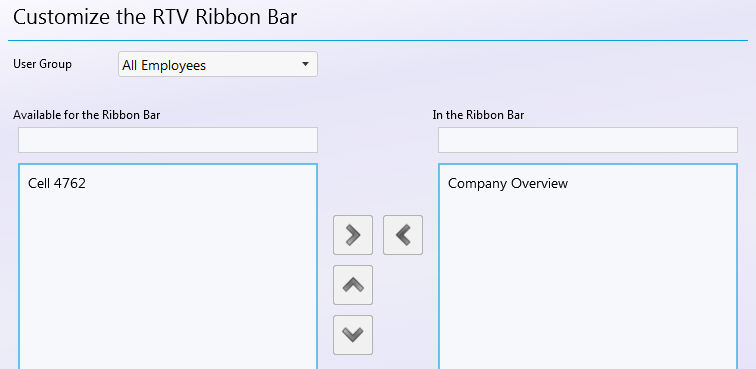
Now, when on the RTV tab there will be shortcut buttons for each screen in the ribbon bar. The number on the icon represents the number of Views that were placed on the screen. The red numbers indicate personal screens and the blue numbers represent assigned group screens.

Creating and Modifying RTV Screens
Creating the screens at a user level is done on the RTV tab. Pressing either the My Screens or the Group Screens button and then clicking the Add and Modify Screens item will bring up a library of User and User Group assigned screens. When creating or modifying My Screens, the Screen Type drop down will be available.
The Screen Type drop down has three options:
- My Screens which are screens created from the RTV tab and therefore associated to the logged in user.
- Company Screens which are screens created from the Group Screens button and associated to a user group that the logged in user is a member of.
- All Screens (the default) shows a combination of the user screen and the user groups screens.
The logged in user cannot modify or remove company based Screens. If a company based screen is selected in the grid the Modify and Remove buttons will be disabled. These can be modified or removed from the Group Screens section.
The Copy URL button will generate a URL to view or share the currently selected RTV screen. This URL can be used in a web browser on Desktop or Mobile to view the RTV screen within Data Display. No user login is required.
The Copy button will be available for both User and Company created Screens. When copying a company Screen the new Screen will be a user Screen if on the My Screens page. The new screen can now be renamed and the description can be changed. If a copy is made from the Group Screens page, the copy will remain a group screen.
When adding, modifying or copying a screen the Next button will bring up the screen designer.
Note: If a screen has been modified while it is in use, it will automatically refresh the data after two minutes. For instance, if there is an RTV screen displaying a Timeline chart and a machine is removed from that display, that machine will automatically be removed from all of the RTV screens actively displaying that view within two minutes.
Screen Designer
The screen designer is accessed by clicking Next while creating or modifying RTV screens. This is where the process of building the view takes place.
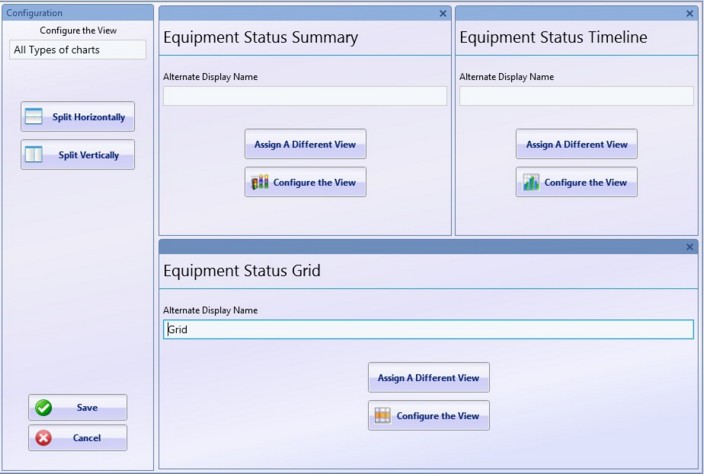
The designer is structured with three areas. The panel on the left has options for configuring the RTV screen, such as the name of the screen and the ability to split the window into sections. The right side panel provides some general information. The center panel is the actual RTV screen. The RTV screen starts off with one window. Additional windows can be created by selecting the window and pressing one of the Split buttons after the fist screen is created.
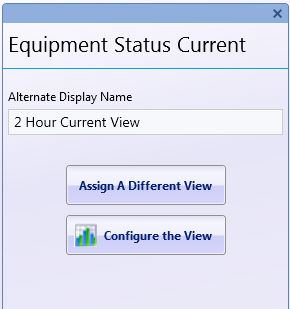
Each window will have a button labeled Assign a View. Pressing the button will bring up a list of all of the possible views allowing view types to be assigned to the window. Click here for the available view types. Once a view type has been assigned the Configure the View option becomes available which allows fine-tuning of the view, and the Assign a View button will be renamed to Assign a Different View. The Configure the View button will bring up a window with the options to configure the associated view.
Each window also contains a text box labeled Alternate Display Name which can optionally be filled out. If this is left blank then the View Type name will be used as the name. If it is filled out then the alternate name will be used rather than the View Type name.
On the left side panel of the designer the screen name can be modified if desired. Below the screen name there are two buttons, Split Vertically and Split Horizontally. Select the center panel then the two split button will become enabled allowing the creation of as many panels in any configuration by repeating the process of splitting the currently selected panel. The windows can be resized using the dividing bars between each window.
The position of the windows can be swapped by dragging a window by the title bar. In addition, the size of the windows can be changed by dragging the dividing bars between the windows.